Veradek Privacy Screen – More Than Worth It (a Review)
We talk a lot on this site about privacy screens and all the options you have for balconies, verandas, and other outdoor spaces. I’m taking it in a different direction in this article by reviewing a privacy screen I bought for my balcony, the Veradek Privacy Screen.
Below, I’ll cover everything you need to know to decide whether this is the right privacy solution for your needs (spoiler alert, it probably is!).
I’ll discuss its useful features and helpful installation tips along with any potential downsides that are worth knowing.
Veradek Privacy Screen
The Veradek Privacy Screen is, technically speaking, a metal screen divider, but it’s sold as an outdoor privacy screen.
It comes in a variety of configurations and sizes, so it’s well suited for any type of outdoor space – so whether you have a balcony, deck, patio or backyard, this screen will work for you.
Overview and Features
The Veradek Privacy Screen is made from galvanized steel, which is powder coated. In short, this is a form of painting and, while the specifics don’t matter, it translates to greater durability and scratch resistance.
The screen is resistant to pretty much any type of weather you might encounter. It’s crack and fade resistant and is rated for temperatures ranging from -30 to 125F. The only potential concern is strong wind, but this shouldn’t be an issue if you install it securely (more on this later).
I’ve personally had it on my balcony for 3 years, and it looks exactly the same today as it did when it was brand new. In my experience, this has far greater durability than many comparative products and has surpassed my expectations.
Dimensions
The Veradek privacy screen comes in a number of configurations, so dimensions will vary depending on which one you choose.
Available dimensions will also depend on where you ultimately purchase this screen from (more on this later).
The most popular configuration is the 3-piece set with stand (which is what I got). Its dimensions are:
- Height: 76”
- Width: 45”
- Depth: 1.75” (without feet); 19.75” (with feet)
If you’re looking for something with a little more height, the screen is also available in a 4-piece set where the height is 100” (other dimensions are the same).
Alternately, if you’re looking for something a bit shorter, the screen can be purchased in a 2-piece configuration that’s 52” tall.
How many you’ll need will depend on the size of your balcony. My balcony is extra-long, so I had to buy 5 sets, but you shouldn’t need more than 2 for a standard-sized balcony (and Amazon offers a deal on a set of two)
Design

The Veradek privacy screen comes in 8 different patterns.
Each pattern is different from a décor perspective (so it will suit a number of styles), and each pattern also offers a different level of privacy, from 55% to 95%.
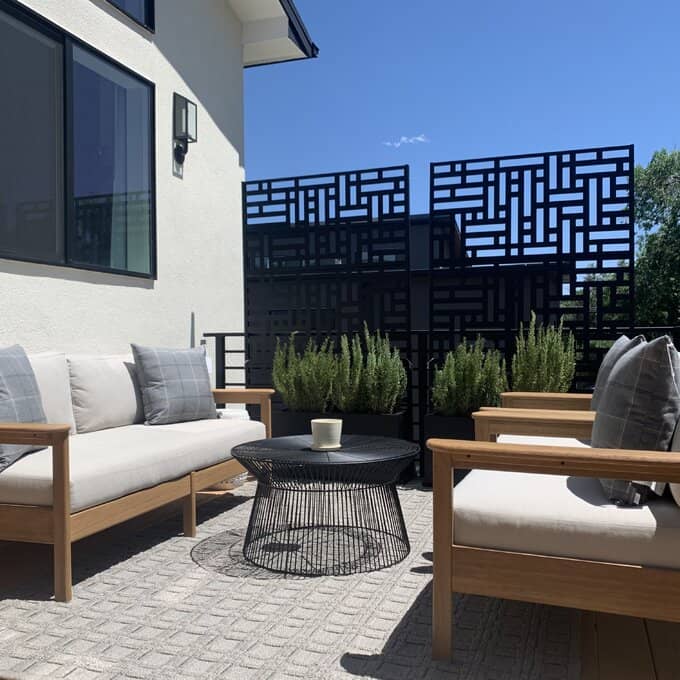
I bought the blocks pattern, which features geometric shapes and 65% privacy coverage. It has a nice modern vibe, which I selected to go with my modern interior decor.
Each privacy screen comes in 2 colors – black and corten steel, which is like a brown orange. I bought the screen in black, which is a great color to go with plenty of styles.
Privacy
The blocks pattern provides 65% privacy coverage. This means that it blocks 65% of the view, meaning it still lets in some light. While Veradek does make screens with greater privacy (such as the linear at 95% and the quadra at 85%), the blocks pattern strikes a good balance between privacy and usability.
For example, 65% privacy offers the following compromises:
- It still lets in light while shielding you from glare
- It allows enough of a breeze in to keep you cool
- From a distance, the remaining 35% won’t mean much to any potential onlookers
- It has enough gaps for you to still see out as needed
Of course, if you feel you need greater privacy, there are other options out there. Alternatively, you could grow some plants up it, such as jasmine or honeysuckle.
In my personal experience, though, 65% coverage is a great balance.
Uses

This should be fairly obvious, right? After all, what does a privacy screen do other than shield your outdoor space? There are actually a few different ways you could use the Veradek Privacy Screen outdoors:
- Fix it to your balcony railing for greater privacy while not affecting the light that comes through
- As a space divider to mark the boundary between a patio and lawn, for example
- For hiding an AC vent, trash bin area, or similar space that isn’t particularly attractive
- As a trellis for plants
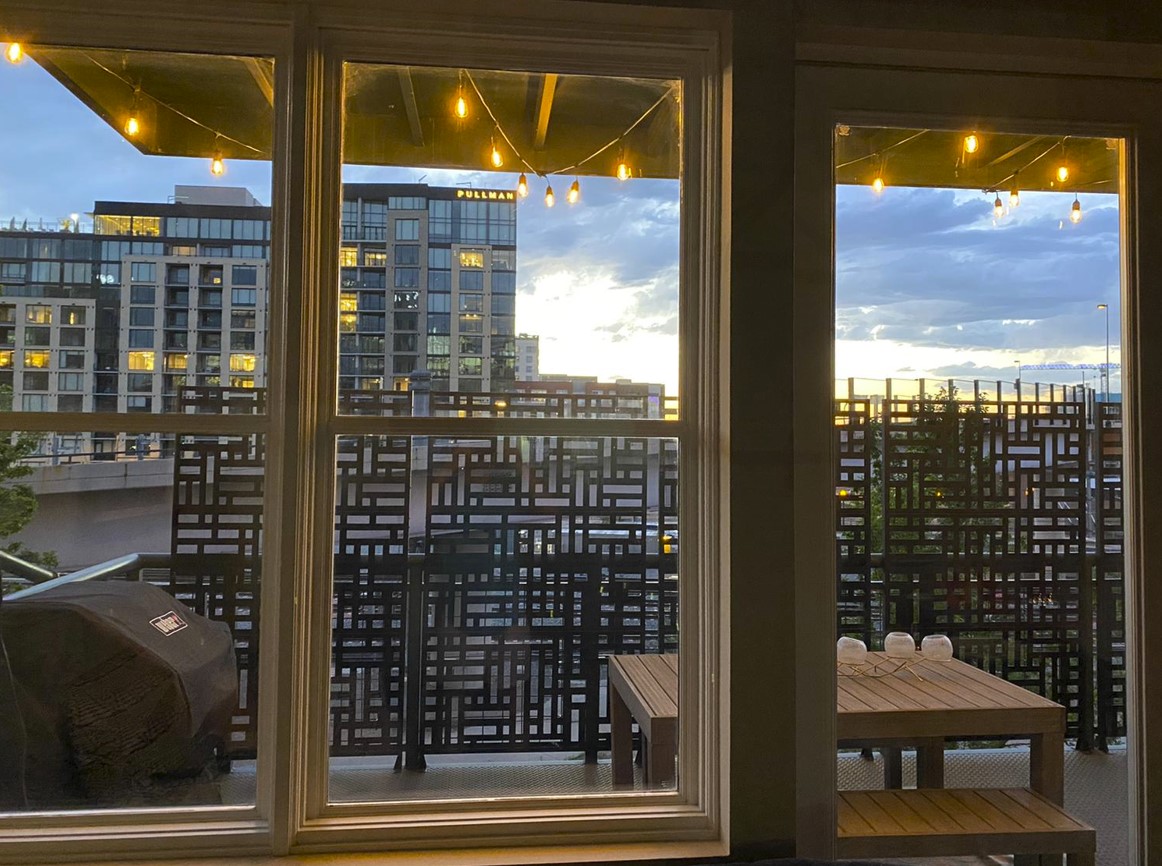
I used mine to block a not so great view AND as a privacy screen for my balcony.
Realistically, the blocks pattern is great for any of the purposes mentioned above, but you might want a screen with greater privacy coverage if you’re hiding trash bins or an AC vent.
Installation
One of the best things about this Veradek screen is that it’s super easy to install. There are 2 main methods: using the feet or fixing it to something (like a balcony railing). I’ll cover them in a bit of detail here.
Installing with the Feet

The privacy screen set comes with a stand (feet), although it’s only possible to use this in its vertical configuration. The screen has holes pre-drilled, so all you need to do is screw the stand in place.
Its feet are pretty wide, but I’d recommend having some extra stability if you’re using it somewhere windy. Sand bags are a good option if you don’t have anything to fix the screen to. Try these photographic sand bags, which are relatively small but should be more than enough.
If you’re planning to use this on a balcony, it’s always a good idea to fix it to your balcony railing for extra security.
I installed my screen with the feet and it to my balcony using black zip ties.
Installing without the Feet
Each full screen consists of 2 or more individual panels, which is mainly to make shipping easier. As such, you will need to assemble the frames and panels to make the complete screen.
However, you can install them horizontally – or vertically – without the stand. This is a great option for balconies where you might just want to block off your railing while leaving your view unaffected.
To do so, use zip ties (like these), which I just attached periodically until the panels were secure enough. If your balcony railing is particularly thick, make sure you buy extra-long zip ties (like these). Zip ties can also be handy if you’re using the stand because they provide plenty of extra security.
There’s not really much more to say about installation. Either method is incredibly easy and shouldn’t take you more than an hour (including assembly).

Pros and Cons
Let’s go over the pros and cons of the Veradek Privacy Screen to see whether this is the best product for your needs.
Pros
- Durability. I’ve been amazed by how durable this screen is. After 3 years of weather exposure, it looks no different to day 1.
- Flexibility. These panels are easy to adapt to your space and needs – you can fix several together for more privacy.
- Easy installation. What more needs saying? Setup is a breeze.
Cons
- Price. On a per-screen basis, the Veradek is a bit pricey. However, it’s a quality product that I believe is well worth the investment.
- Feet depth. This is a minor issue, but the feet are quite deep, which could affect your placement when using the stand. This also might be a concern if you have a super narrow balcony, but you can combat this by installing the screen without the feet.
Where to Buy
There are a number of online retailers that carry the Veradek Privacy Screen, so it’s really a matter of individual preference in terms of where to buy.
Buying directly off the Veradek website will give you the most options in terms of configurations and colors, but you can also find it on Amazon, Pottery Barn, Wayfair, etc.
Here are some helpful links:
- Veradek Privacy Screen (Amazon)
- Veradek website
Alternatives to the Veradek Screen
Unsurprisingly, the Veradek privacy screen isn’t the only product on the market. So, what else is out there, and is the Veradek still the best option?
If you search online, you’ll quickly find thousands of similar products. However, many of them are made from cheaper materials (like plastic or bamboo) or are far more expensive than they should be. Don’t get me wrong, I love natural products like bamboo, but sometimes you just can’t beat the durability of galvanized steel!
In my opinion, the only product that’s truly comparable is this privacy screen from Elevens. It offers very similar specs and materials but it’s painted white rather than black. For some, this might be a major selling point because it’s certainly a lot brighter and will go with a different style of décor.
However, white will show up marks more than black. Powder coatings are very durable, but it’s no secret that marks will be more obvious on a white screen. I haven’t personally tested this screen, though, so I can’t say how good it actually is.
The bottom line is that the Veradek screen is a particular stand-out product because it’s really quite durable and easy to set up. While there are loads of other screens out there, I’ve been incredibly impressed by its quality.
Final Thoughts
My experience has shown me that the Veradek Privacy Screen is a great screen that’s functional and durable, and about as easy to use as it could be. While it looks like an expensive product, the cost spread over its lifetime really isn’t that bad.
Of course, if you don’t think it meets your needs, use the factors I’ve discussed above to narrow down your choices so you can make an informed decision about the best privacy screen.