How to Make Your Own DIY Balcony Shade
Apartment balconies are ideal outdoor spaces for catching a bit of sun. But, if you want a break from glaring sunlight, your options are slightly limited.
Unless you build a balcony shade. Sure, you could buy one, but making a DIY sun shade is actually really easy and requires only a few inexpensive materials. Plus, you get to customize everything.
In this article, we’ll provide a DIY guide for 2 different types of balcony shades. One is for covered balconies and the other for exposed balconies. Hopefully, one will be suitable for your space and needs.
The Requirements of a DIY Balcony Shade
When building a DIY shade canopy for a balcony, there are some important things to consider.
First, most apartment dwellers don’t have a big set of tools or much room to work on major DIY projects. So, the instructions we’ve detailed below are quite light on traditional construction methods. The most you’ll have to do is a bit of sewing and sticking.
Also, there aren’t any materials suggested that are difficult to buy. You’ll find pretty much everything online or in a local DIY store.
These designs are straightforward, too. As a result, there are loads of ways you can dress them up or customize them for your space. Think flowers, hanging plants or lights, patterned fabric, and much more.
Second, these instructions involve as few invasive steps as possible (if any). Whether it’s rental agreements or building regulations, there are often restrictions in place that prevent those living in apartments from making noticeable changes, so we’ve made our recommendations as renter friendly as possible.
If you do own your apartment, check with your management company on whether you’re allowed to drill holes and put things up. The biggest difference this’ll make is that your balcony shade will be more secure.
DIY Sun Shade for Covered Balconies
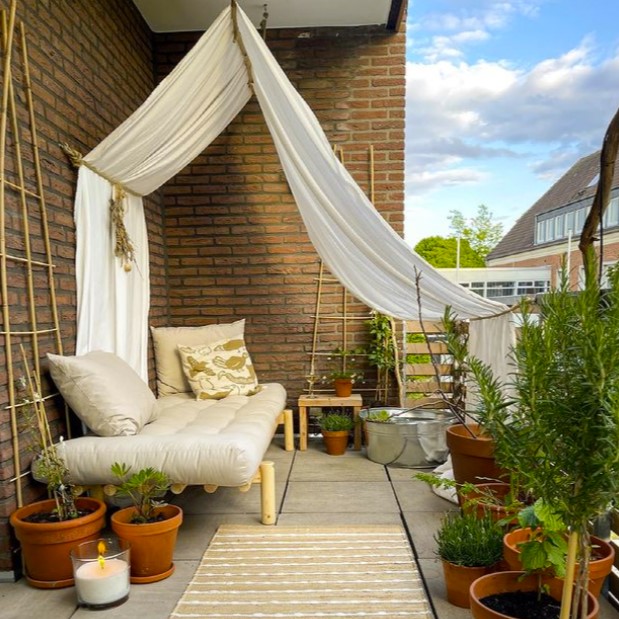
The first method is for covered balconies, which are slightly shaded already from the above apartment’s balcony. Having a covered balcony already gives you a really useful base for your DIY shade canopy because you’ll have something to anchor from.
Materials
- Heavy-duty adhesive hooks
- Some fabric (canvas is great)
- Some strong string or rope
Method
This method is super simple. The products linked above are just examples of the things you’ll need. You can replace them with items that suit your style better (like sheer fabric), but make sure they’re still heavy duty.
The hooks, for example, can take 40lbs. of weight each. This is more than enough for most fabric canopy shades, but you won’t want to go much lower. Stronger hooks will simply last longer.
So, the method is as follows:
1. Measure your fabric
The exact measurements will be dependent on how much of your balcony you want to shade. That said, the length is easier to calculate.
Use a tape measure to get the length between the balcony roof and the bottom of the security railing. Add a foot or two onto this and then double it. This should be a suitable length for your balcony sun shade.
2. Gather your hooks and rope
Next, you need to start placing the hooks. You want two hooks per spot, as you’ll string a piece of rope between them.
It’s best to have one behind your seating area to hold the back of the fabric down. Position the other somewhere above your head. Roughly the middle of the balcony is ideal.
If your balcony railing is a solid wall, consider adding a third one here to keep the fabric in place while the balcony shade is open.
3. Tie up the rope
Cut your rope to size, which should be the distance between the two hooks in each set.
Tie a small loop at the end of the rope so you can easily hook it over the hooks. Do this next.
4. Hang the fabric
The final step is to simply hang the fabric. Thread it through the rope, although it might be easier to gather it like a curtain inside the rope and then hang it up.
When you want to let the sun in, simply tuck the balcony shade out the way.
If you want a slightly different design, use the same method to create a teepee effect on your balcony.
DIY Shade for Exposed Balconies
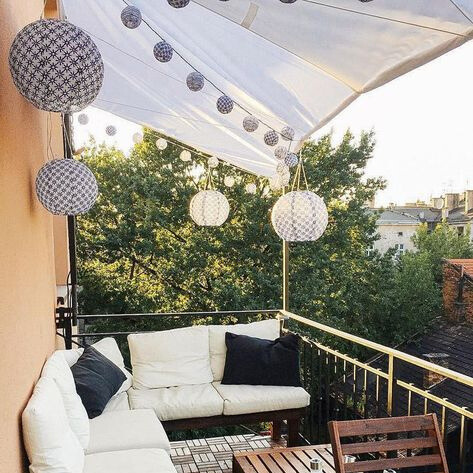
This method requires a bit more construction but is still easy. It’s based on a sail shade, which you might have seen for sale in home stores.
Materials
- Thin poles (e.g. beach tent poles or tarp poles)
- Fabric (cotton or canvas)
- Heavy-duty hooks (linked above)
- Twine
- Flagpole mounting brackets
Method
1. Build a frame
The first step is to build a frame that you’ll fix onto your balcony railing. It should have two vertical poles and a horizontal beam.
Ideally, it should probably have a maximum height of about 7’ including the balcony railing.
Build this frame however you want. Some tent poles and twine will do the job, but if you want something more permanent, make a timber frame.
Attach it to your balcony using something like a flagpole mounting bracket, as this should fit the poles fine.
2. Fit hooks
Fix some hooks to the wall of your apartment. You’ll then hang the fabric from these.
Space them evenly and use at least 4 depending on the size of your fabric.
3. Hang the fabric
If the fabric has eyelets, great. If not, watch this video so you can add some yourself.
Hang the fabric from the hooks and drape it over the frame you built. Tie it down in the corners using some twine so that it stays in place.
That’s all there is to the basic design. If you want to get really fancy, try turning the front of your DIY sail canopy into a roll-up blind. In the method linked here, just start from the second step.
Conclusion
Hopefully, these two rough guides for a balcony shade have given you some ideas for your space. The best thing about them is that they’re adjustable and involve no invasive DIY work!
Making a balcony sun shade for your apartment is quick and easy, and, most importantly, is completely customizable to your space and design. Enjoy!