DIY Balcony Dog Potty Areas with Real Grass
Looking for a dog potty solution for your apartment? I’ve built plenty of DIY dog potties on my balcony. Below you’ll find several ideas using real grass, along with step-by-step instructions and supply lists!
If you live in an apartment or condo with your furry best friend, chances are that you don’t have access to a private yard right outside your door. This means that every time your dog needs to go, you have to take them on a walk.
While most of us happily accept this fact, there are many circumstances where it can be less than ideal for both you and your pet.
Puppies and senior dogs, for example, aren’t able to hold it as long as other dogs and require more frequent bathroom breaks during the day and night. Dogs recovering from injuries or ones dealing with hip, joint or back issues may have a hard time making the trip down a long corridor or a flight of stairs every time they need to go.
No matter what situation you find yourself in, a short trip to your balcony door is probably preferable to a walk outside in the snow at 2am, and this is where a dog litter box – otherwise known as a dog potty – can be beneficial.
DIY Balcony Dog Potty Advantages
There are lots of options for an outdoor dog potty area, but a DIY project has a major advantage over the others because it gives you the ability to customize every single aspect of your project to fit your needs. You determine the size, shape, budget and materials used. This is a huge advantage for any apartment dweller that’s dealing with an awkwardly shaped balcony or a dog that’s super picky about where they do their business.
My dogs and I have tried some of the subscription-based dog potty services and while they may work for some people, my dogs didn’t enjoy “doing their business” on artificial grass, nor did they enjoy being confined to a super tiny toilet area via a small grass patch.
I also didn’t enjoy the messy and somewhat disgusting cleanup that comes with emptying potty trays. And that’s why a DIY dog potty became our go-to solution.
What if You’re not a DIY Person?
I am personally NOT a DIY person and didn’t even own a power drill a couple of years ago, which is why I put off creating a DIY dog potty area to begin with.
After doing a ton of research and building a few of these dog potties, I’ve come up with three different iterations that can easily be replicated by anyone who isn’t handy.
The first two that I built required minimal drilling, but my third project (#3 on this list) requires absolutely ZERO TOOLS OR DRILLING.
So whether you’re OK with minimal drilling or if you want to avoid tools all together, you’ll be able to find a DIY dog potty project here.
Dog Potty Materials
There are actually quite a few options for dog potty materials. If you’re wondering whether to use grass, mulch, rocks, or something else, check out my article on Best Dog Potty Materials, where I’ll go over the pros/cons for each.
For the projects I share below, I’m using real grass (which I grew on my balcony) for all of them. On one, I use a combination of real grass and rocks.
DIY Potty Box #1 – The Original Real Grass Dog Potty
Supplies Needed
- Lumber (for your frame):
- Screws (to hold the lumber together)
- Peg board (this is optional, but I use it to make cleanup easier. See more below under “additional project notes”)
- Landscape fabric
- Potting / Garden Soil
- Sod (grass)
- I don’t recommend purchasing sod online. Instead, I’d recommend you purchase this in person on the day of completing your project. Hardware stores like Home Depot or Lowe’s will sell sod by roll that is approx. 2 ft x 4 ft
- If you don’t want to purchase sod, we also have a guide for how to grow your own balcony grass
- Power Drill (if you don’t already have one)
- Pea Gravel
Instructions
1. Determine your specs
This all depends on the actual layout of your outdoor space and how large you want your dog friendly balcony area to be. I have a massive space, so I ended up building a dog potty that was 8 ft x 6 ft.
Helpful tip: If you’re not too particular on dimension requirements and are just looking for the easiest thing to do, I’d recommend building a 4 ft x 4 ft area as a lot of other materials you’ll need will fit perfectly. The links for lumber and peg boards included on the supplies list will work perfectly for a 4 ft x 4 ft area. Most outdoor sod (grass) rolls also come in 2 ft x 4 ft dimensions, which means you would just need 2 rolls to fit your space.
2. Order your supplies
Now that you finalized your specs in step 1, you will need to figure out which supplies you’ll need and how much. Some of this is easy and can be determined by measurements – for example, if you’re building a 4 ft x 4 ft area, you’ll need (2) rolls of 2 ft x 4 ft sod. Other items like soil or gravel are a bit trickier to determine, but Home Depot has a helpful tool that will tell you how much you’ll need based on your dimensions.
For my 8 ft x 6 ft dog potty, I needed:
- (2) 2×6 pieces of lumber
- (2) 2×8 pieces of lumber
- (4) screws
- (6) 2×4 peg boards
- (1) roll of landscape fabric
- (5) bags of potting soil
- (5) rolls of sod
- (4) bags of pea gravel
3. Build out your frame
You will need a power drill to drill the screws into the lumber. Once this is done, place the frame where you want it.
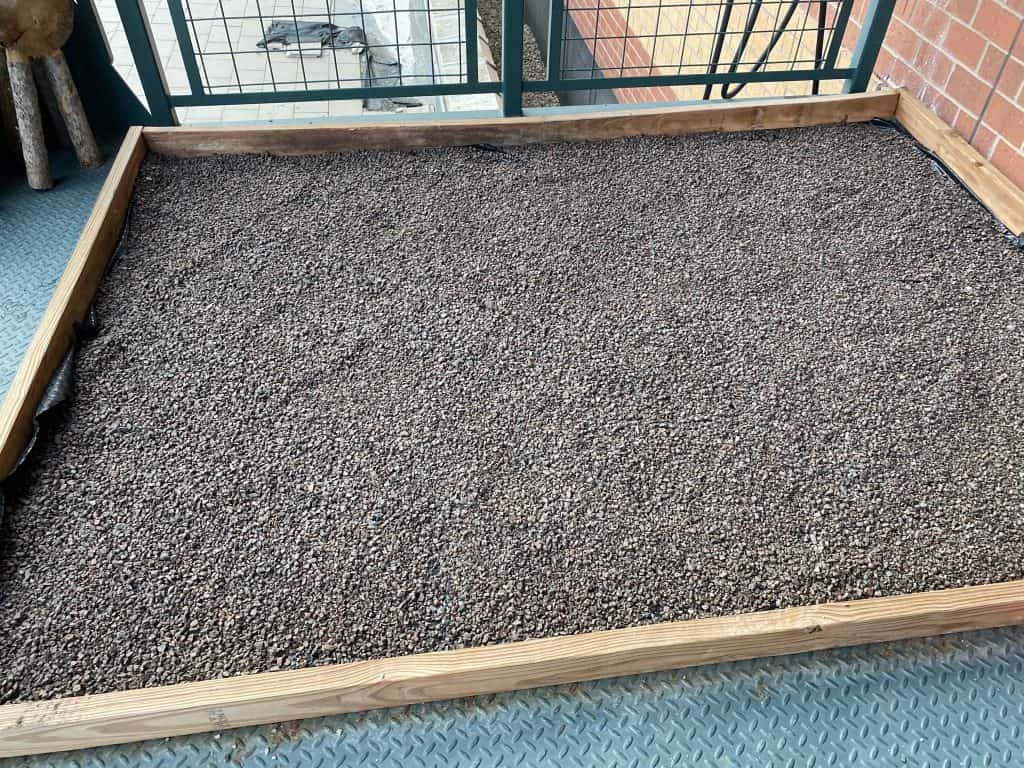
4. Create a base layer of pea gravel
Pea gravel is important for drainage and is a good base layer for your outdoor dog potty.
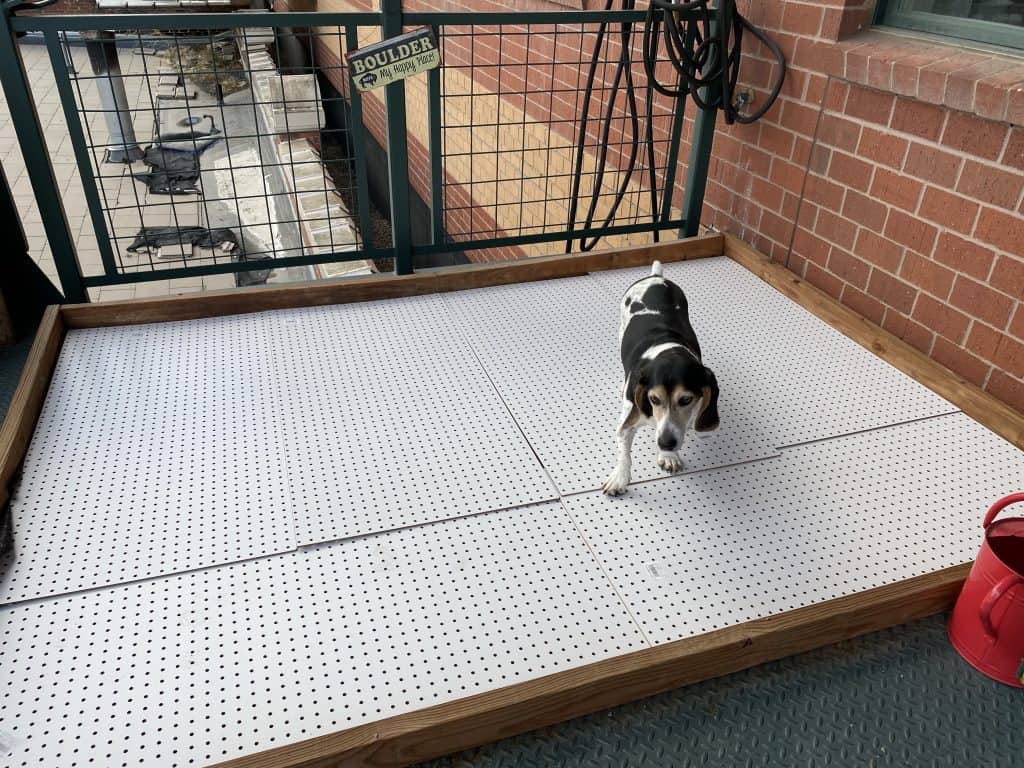
5. Lay the peg board(s) down on top of the pea gravel
If your peg board doesn’t fit perfectly within your frame, don’t worry! Mine didn’t fit perfectly either and you can see that they overlap in certain places… not a big deal at all. If anything, you can compensate for the unevenness when you put the soil layer on.
Your dog might want to check out your project while in progress as well 🙂
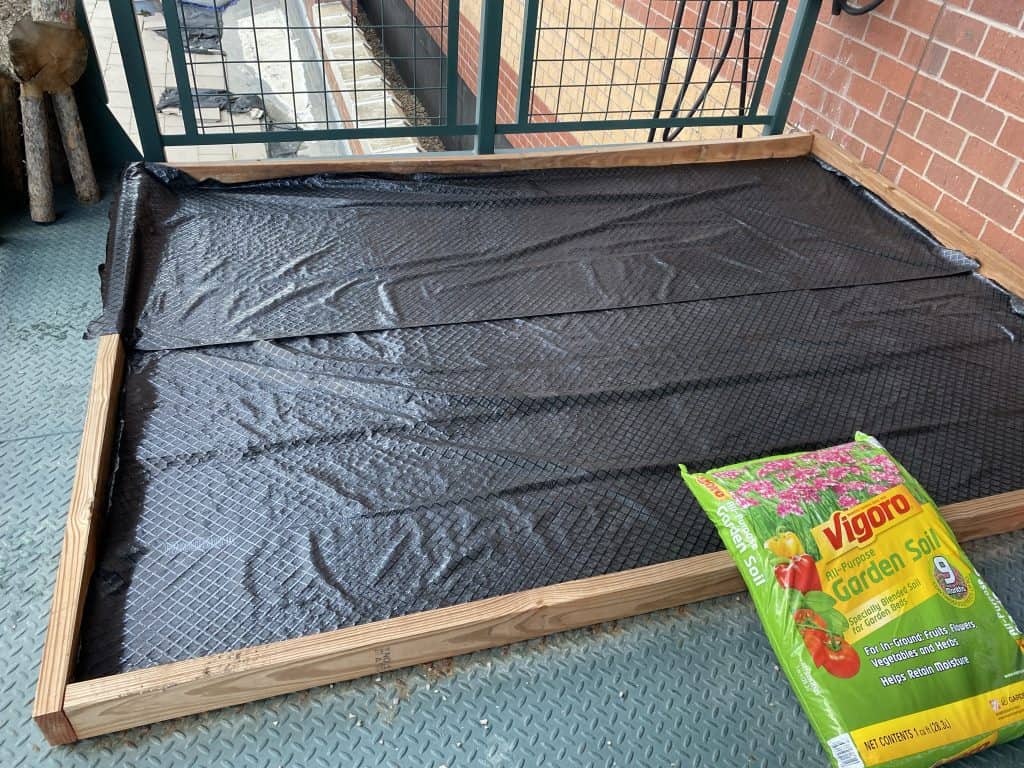
6. Place the landscape fabric over the peg board
This will ensure that the soil doesn’t run through the holes.
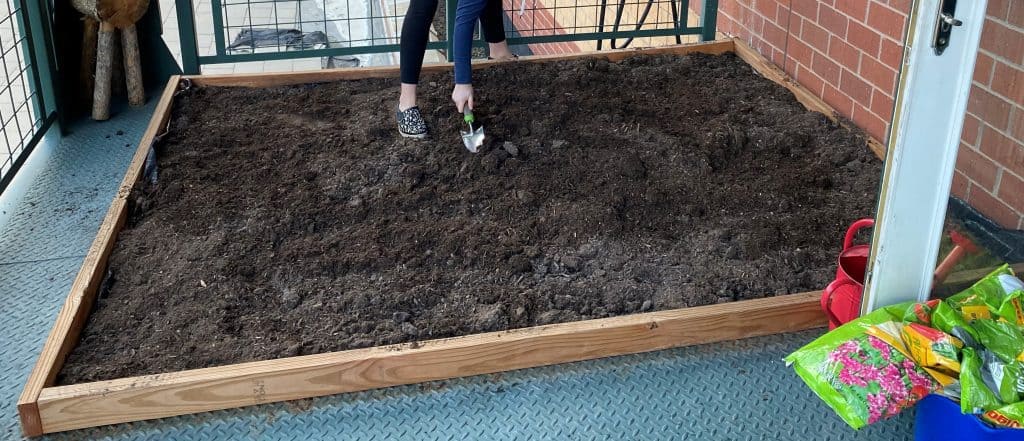
7. Place the potting soil over the landscape fabric
Use a shovel or similar device to ensure that everything is level.
8. Lay the sod over the potting soil and pat down. Immediately water the area.
You may have to use a knife to cut any leftover sod to ensure that everything fits tightly in the frame.
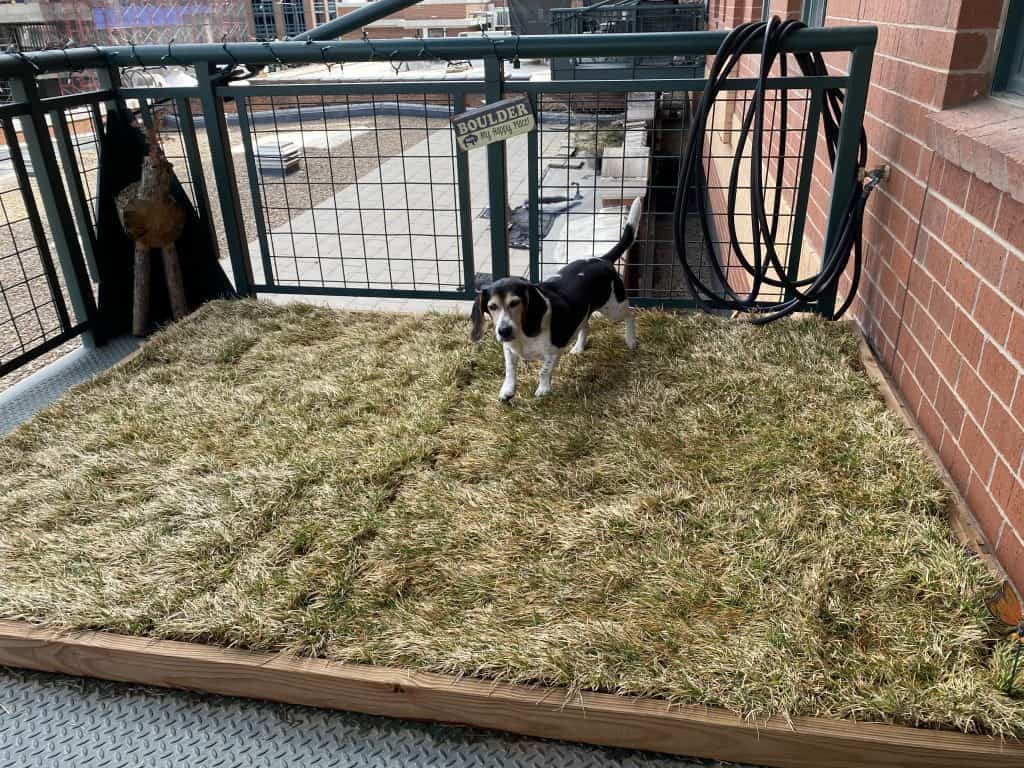
NOTE: I completed this project in the winter, and as you can see the grass that I bought wasn’t the greenest to begin with. This worked out better the second time around (see dog potty #2).
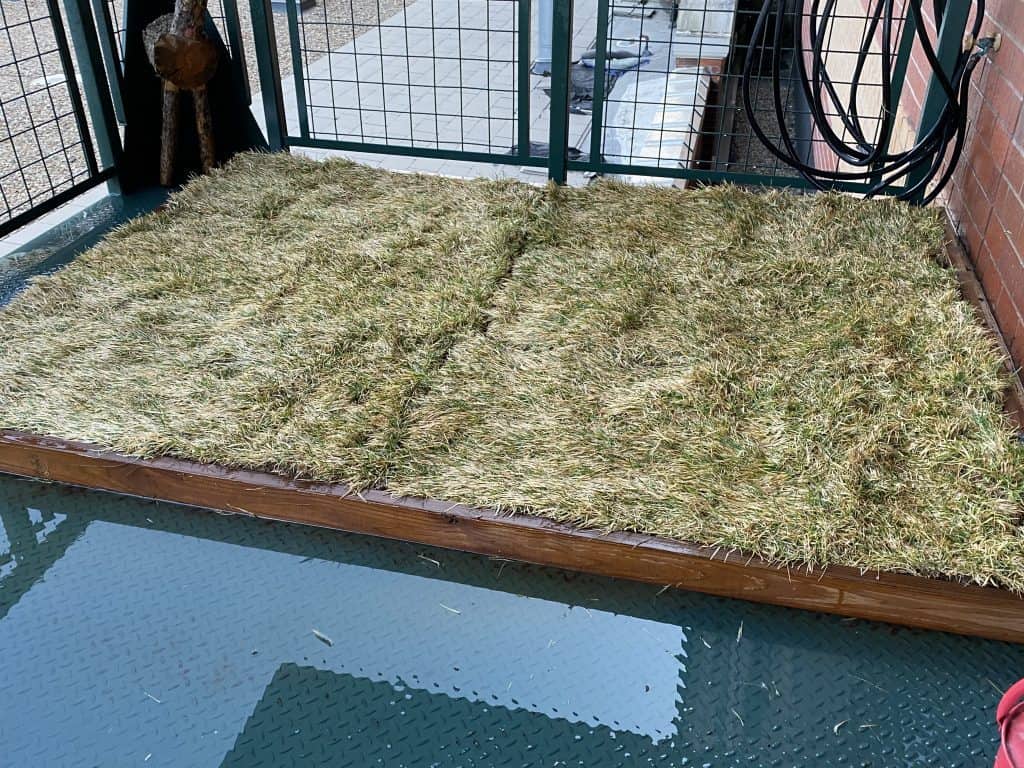
9. Sit back and watch your doggie(s) enjoy their new space!
And obviously water it down 🙂
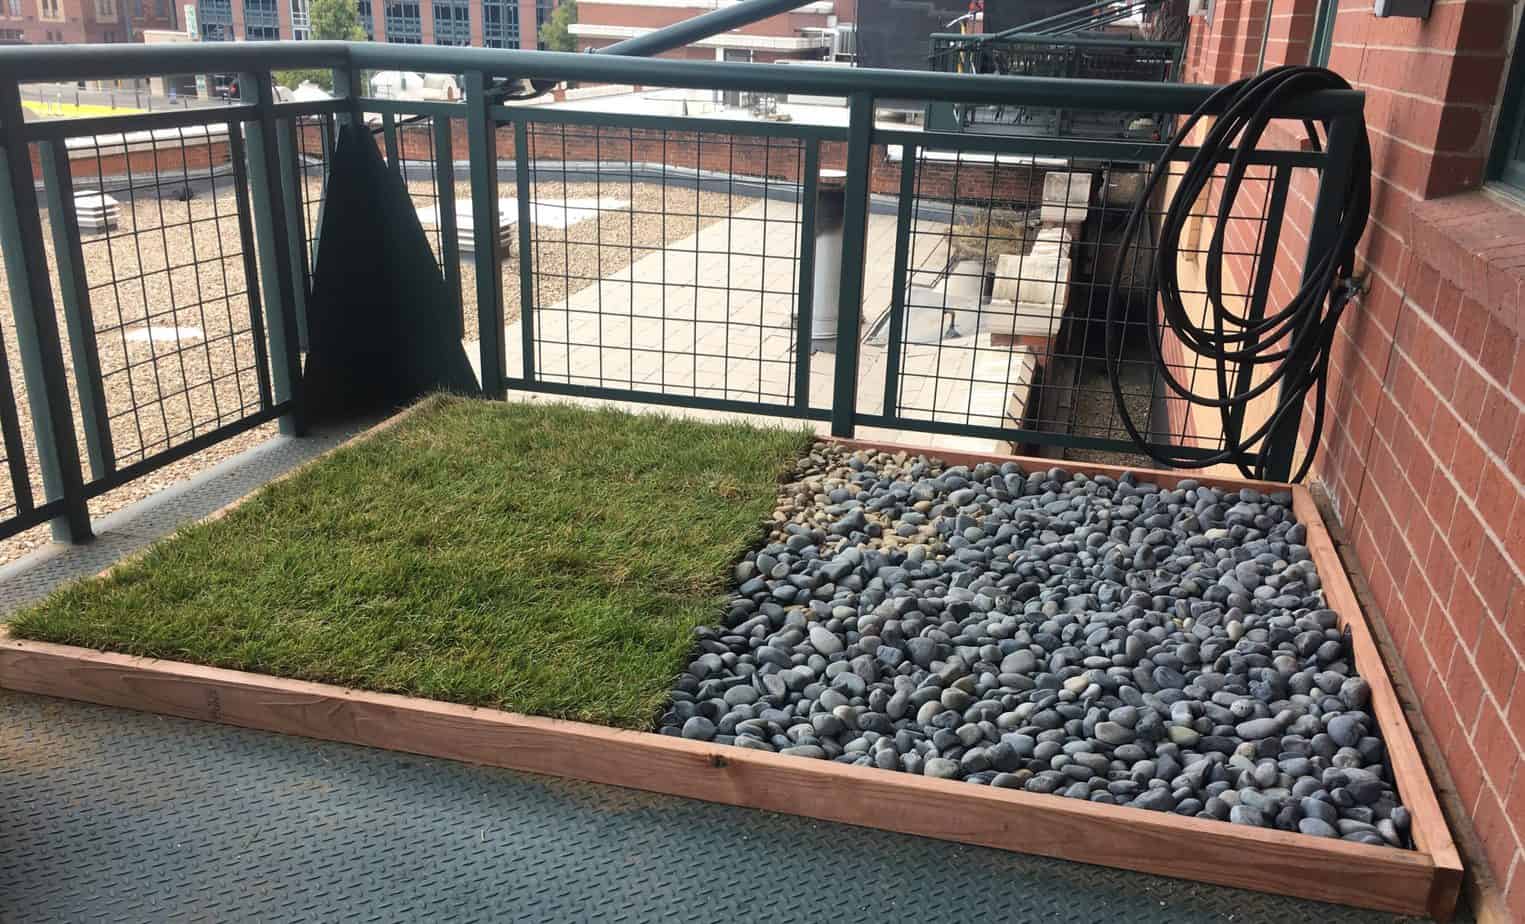
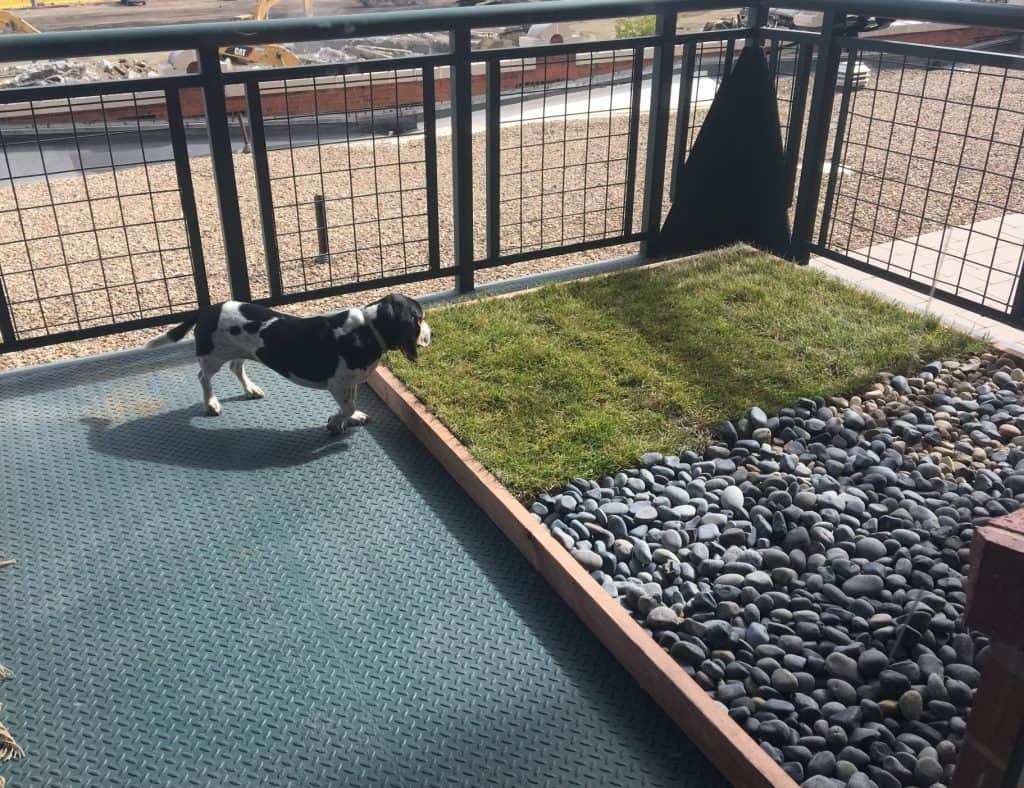
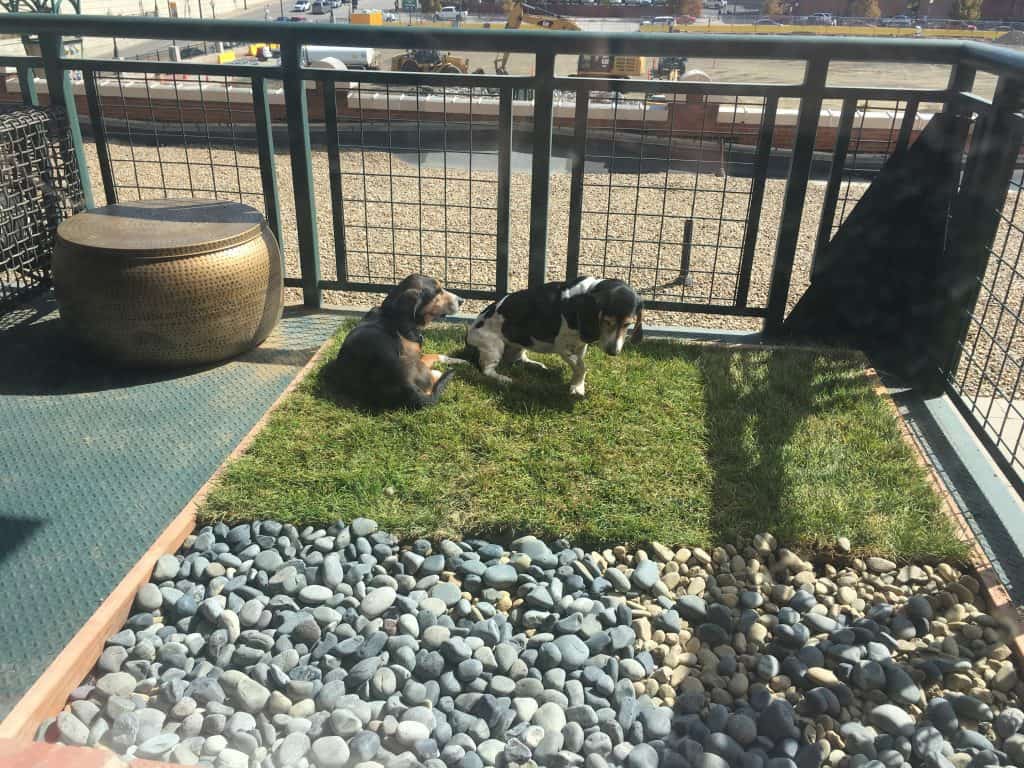
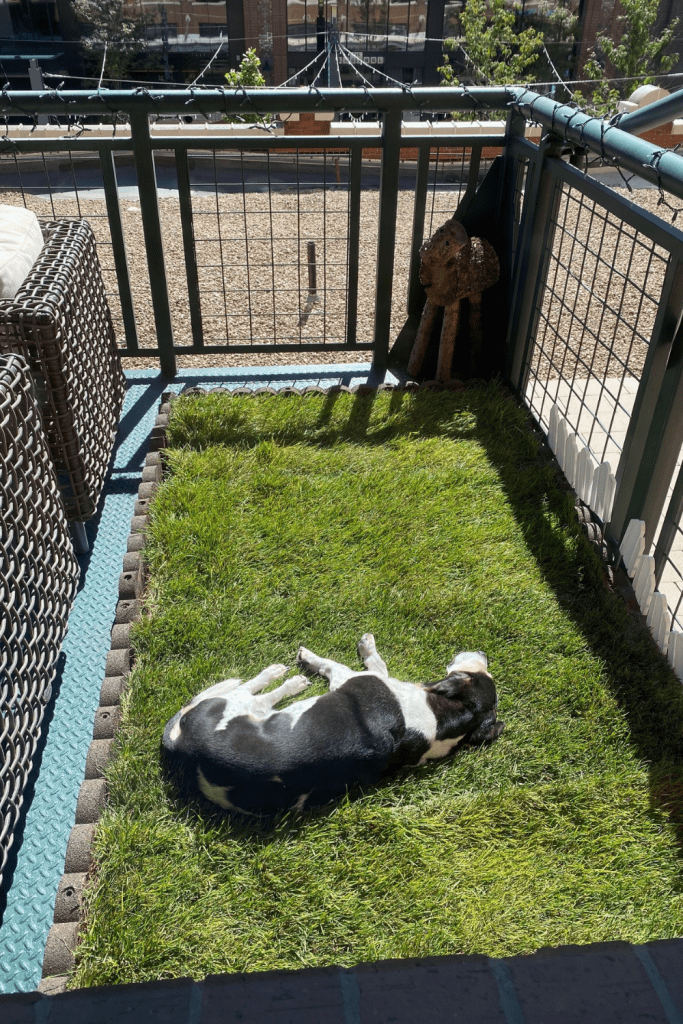
DIY potty box #2 – The Improved Real Grass + Pebbles Combo Dog Potty
For my second outdoor dog potty, I decided to mix up the look at little bit and make it a half real grass / half rocks area.
Supplies Needed
All supplies remain exactly the same as the first dog potty, EXCEPT:
- Only purchase half the amount of potting soil and sod
- Add bags of decorative rocks or pebbles to your purchase.
- For my 8 ft x 6 ft project, I purchased 4 bags
Instructions
All steps remain the same as the first dog potty, EXCEPT:
- For Step #7 (when you lay the potting soil), only lay the potting soil on approximately half of your dog potty box. You will only need the soil layer to go underneath the grass; it isn’t needed under the rocks
- For Step #8 (when you lay the sod), only lay the sod over half of the area, over the potting soil. As you’ll remember from the supplies list, you’ve only purchased enough sod to cover half the box anyway. Lay the pebbles over the rest of the area
DIY potty box #3 – The Easiest, Tools-Free Real Grass Dog Potty
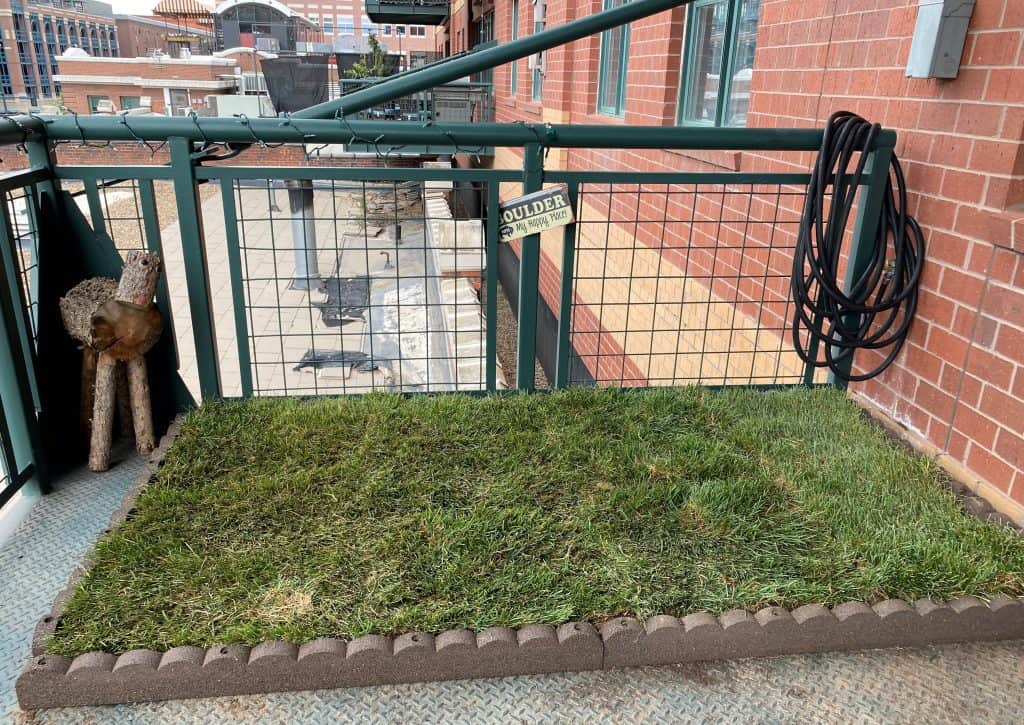
I had repurposed my wood frame for my first two dog potty areas, and after a couple of years of usage, the wood frame started to get warped and needed to be rebuilt. It was time to build a new dog potty, and I couldn’t be bothered to break out the tools again.
I’m happy to say that I was able to make one completely tools-free!
I decided to look for a wood frame alternative and spotted the PERFECT solution while at Home Depot:
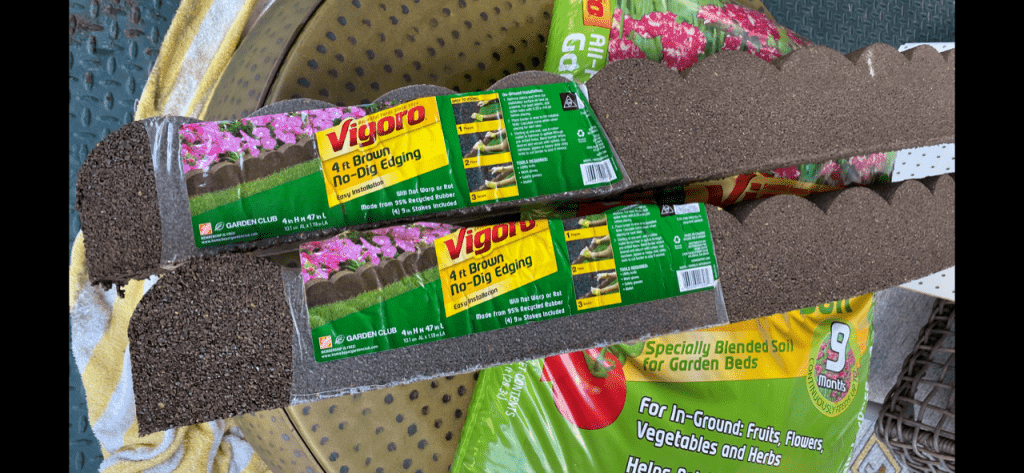
I had no idea if using edging vs a wood frame would work, but I figured I’d try it out and it would be well worth it if I could bypass any need for power tools or drilling.
The Vigoro Rubber Garden Edging pieces are each 4 ft long, so to make things easy I decided to build a dog potty that was 8 ft x 4 ft. This was slightly smaller than my original projects, which were each 8 ft x 6 ft.
And since I was already at Home Depot, I just bought all of my supplies on the spot instead of ordering most of the supplies online.
Supplies Needed
With my first dog potty project, I provided Amazon links to everything that could be purchased online. Home Depot products are MUCH cheaper, so I’ve provided the links to exactly what I bought for this version below.
- Home Depot’s Vigoro Rubber Garden Edging (or Amazon equivalent)
- Peg board
- Landscape fabric
- Potting Soil
- Sod (grass)
- Pea Gravel
For my tools-free 8 ft x 4 ft dog potty, I purchased the following amounts:
- (6) pieces of rubber edging @ $12.97 each
- (4) 2×4 pegboards @ $11.95 each
- (1) roll of landscape fabric @ $12.98
- (4) bags of soil @ $3.97 each
- (4) rolls of sod/grass @ $6.98 each
- (4) bags of pea gravel @ $4.68 each
= $201.12 + tax (NOTE – I am referencing pricing from 2021. The prices of everything have gone up since then).
NOTE: my area is quite large, which is why I built a 8 ft x 4 ft box. If you were to build a 4 ft x 4 ft box, it cuts down the amount of materials needed, which cuts the cost by quite a bit to $120.49 + tax.
Instructions
All steps remain the same as the first dog potty, EXCEPT:
- For Step #3 (where you build out your frame), all you have to do is place your edging where you want it. There is no drilling or need to secure everything together. Everything stays in place on its own!
The Big Reveal!
I can definitely say that this was the easiest DIY dog potty I’ve made to date. I loved that I didn’t have to purchase any lumber or screws, and I love that there was no drilling required. All I had to do was assemble!
I would recommend this option to anyone looking for a super easy and tools-free solution for an outdoor dog potty area.
*NEW* – Dog Potty Box #4 with Dirt-Free Grass

I just finished up my latest project (2024), which you can read all about HERE. The process is different from the dog potties above, so it needs its own post.
It uses 2 supplies only and is completely dirt-free. Zero tools required and by far my easiest project to date. I love it!
Additional Project Notes
- When planning out your specs, I’d recommend sticking with measurements in multiples of 4. Most of the supplies out there (like the peg boards, edging and sod are 4 ft something. This will just make measuring and buying so much easier on your end.
- I personally found that buying all of the supplies (and hauling them up to your apartment) is actually what took the most amount of time. If you want to save time, I’d recommend ordering supplies online EXCEPT for the grass, which will need to be purchased in person.
- Once you have all of your materials, the actual building process should only take about one hour for the first two dog potty boxes and about 30-45 minutes for the tools free dog potty box.
- I get a lot of questions about why a peg board is needed. It is not 100% necessary and is more of a preference, but I use it to create a stable buffer between the soil + fabric and the gravel. This also makes it easier for cleanup later. When you decide to replace the soil later, it’s much easier to lift it up by grabbing the pegboard underneath it.
- There are many dog potty material alternatives to using real grass or pebbles/rocks. Mulch is another popular material to use for your top layer, but just make sure that the mulch you select is pet friendly and non toxic.
- Keep in mind that with lumber and sod, sizing sometimes isn’t always exact, and what you receive might be off by an inch or two. This isn’t a big deal unless you have a very tight space that wouldn’t be able to accommodate a slightly larger frame. If you’re concerned, I would go to the hardware store and make sure the sizing is accurate.
- Final budget for your balcony dog potty will depend on the size you want to build, the materials you select and which supplies you already have. Having to purchase a power drill will add more to your budget.
Overall Dog Potty Maintenance
- Watering your grass is super important! At the beginning, I would suggest watering a couple of times a day. After a week or so, just make sure it’s watered once per day
- How often you replace the sod + soil is dependent on each person’s situation and environment. For me, I replace the sod a couple times a year, and then I do a major overhaul where I replace the sod, soil, peg boards and pea gravel once per year.